
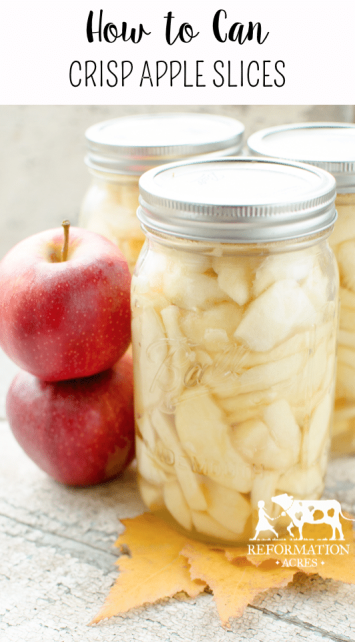
How to Can Apple Slices – Crispy & Sweet
Home-canned provisions are always healthier than the ones bought from the market. Not to mention that you can adapt the recipes to your own taste and preferences. So, when it comes to canned apples, they don’t have to be mushy like the ones I always find at the supermarket.
Apples can be kept for a very long period in a root cellar or other chilly environment. But apples that are peeled, cored, sliced, and canned might save time in the kitchen. You can eat canned apples straight from the jar or add them to your favorite baked, simmered, or fried dishes.
My favorite one is the roasted chicken where I put shredded apples to it. You can easily learn how to can apple slices so they will be sweet, full of fresh fruit flavor, and still CRISPY!

Tips on Canning Apple Slices
Long, long ago (3 years ago) on a far away pin (however, now links to a website with different instructions), while I was making my homemade apple pie, I read about a way to can apple slices that sounded really easy and amazing. So, I had to try it.
However, till last year, when I finally did it, I couldn’t find the time and the drive. Well, with all the lockdowns, all the free time from work, and the necessity of supplies, this recipe came in handy.
Moreover, I canned them right alongside the recommended way, which is in syrup, using the empty jar of my caramelized onion. Adding syrup to canned fruit helps to retain its flavor, color, and shape. However, keep in mind that it does not prevent the spoilage of these foods.
Also, the guidelines I used for preparing and using syrups offer a new “very light” syrup, which approximates the natural sugar content of many fruits.
All in all, the taste testers were unanimous! This recipe really makes the best from the apple slices! These canned apples are sweet yet retained their autumn fresh, ripe flavor.
However, where they really shine is the texture. They’re soft enough to slice with your fork, but not so soft that you can mash them with it.
They still have a crisp bite which, for me, makes all the difference as to whether or not I’ll eat them. Trust me, they felt like pickled cucumbers. The texture is pretty important to me and I can’t stand mushy canned fruit.
The way I really know these apples are a winner? Because they don’t last long in our home at all. No one has even touched the applesauce yet and just a few weeks after canning them, they’re almost gone!
How to Can Apple Slices
Print
How to Can Apple Slices – Crispy & Sweet
Ingredients
- apples in increments of 5 cups
- 3/4 cup sugar for every 5 cups of apples (I used evaporated cane juice, which you can buy here)
Instructions
- Wash, peel, core and slice the apples. (I sliced them into 1/8ths.)
- Layer the sliced apples in a food grade, 5-gallon bucket. Scatter about 5 cups of apples in the bucket and then sprinkle them with 3/4 cup of sugar.
- Continue layering until you’ve run out of apples or have filled your bucket.
- Cover the apples with a plate and then a weight to help press out their juices.
- Cover the bucket with a lid & allow them to sit for 12-24 hours.
- Firmly pack the apple slices into hot, clean, sterilized quarts.
- Transfer the juices to a stockpot and bring them to a boil.
- Ladle the hot juice over the apples leaving 1/2″ headspace, but covering the apples. (If you have too many slices in the jars, remove them.)
- Run a canning knife (like you find in this function canning kit) down the sides of the jar to remove air bubbles, wipe rim of the jar with a wet rag, and top them with a warm ring and lid.
- Process the quarts in a waterbath canner for 20 minutes.
Final Thoughts
Finally, it’s your time to share all your thoughts about this recipe in the comments section. Tell me all about what is your opinion on this method. Please, do not hesitate to give all of us further advice and to ask any other questions! We are all here to learn from each other!
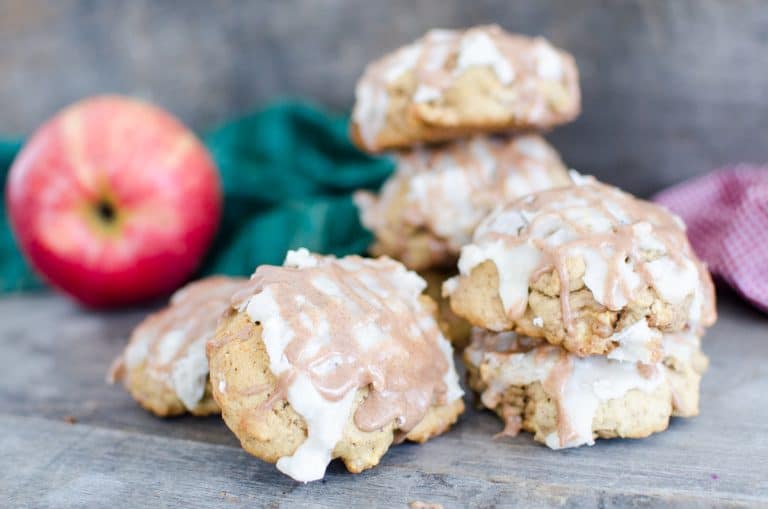
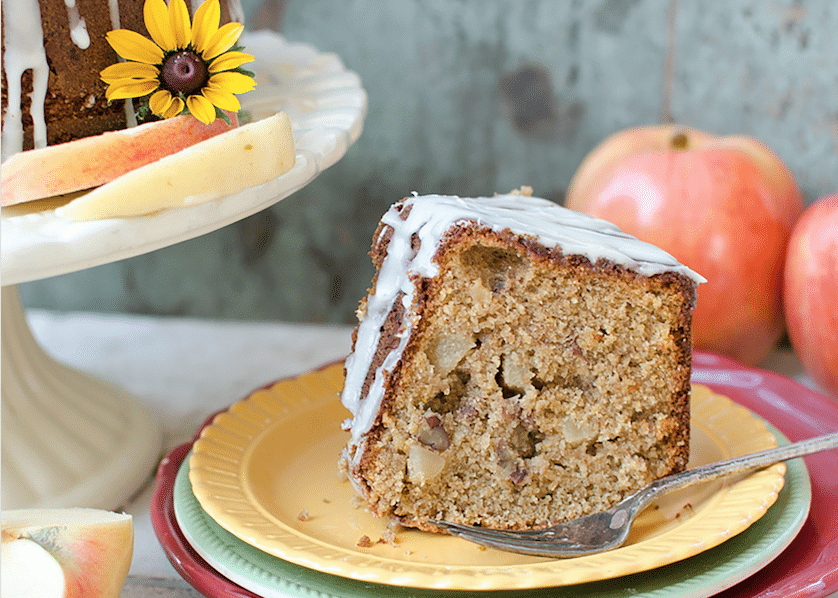
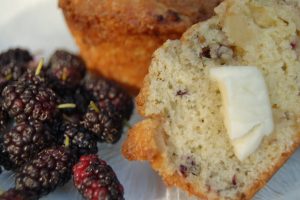
Last but not least, you could try really hard to save them for use in recipes throughout the winter such as:

- Glazed Apple Cookies – wonderfully delicious, made soft and cake-like by the apple, that highlights the warm spicy flavors that embody fall baking. (Especially, if you get bored with pumpkin cookies. But that’s a big “if.”)
- Whole Grain Harvest Apple Butter Cake – Dry, crunchy, and flavorless, right? Maybe a little extra glaze over the top just in case!
- Mulberry Apple Muffins – Don’t know what to do with all the mulberries you have on hand? Mulberry-Apple Muffins are sure to please your family. The streusel topping is only optional.
- Apple Cinnamon Sourdough Muffins – Sourdough muffins obviously bake up faster than bread so my batter is going into muffin tins and baking for 20 minutes rather than a loaf and baking for an hour.
However, good luck with that! Cause I know it’s never gonna happen here! They’re too tasty to snack on all on their own!
Enjoy!
No products found.
Last update on 2026-05-09 at 04:22 / Affiliate links / Images from Amazon Product Advertising API
Please help!
After all that I did to prepare the apples, I had a crisis and I did not get to can them after 24 hours I am now on 36 hours! Do you think it would still be safe to proceed?
You should be able to proceed, but they may not be as crisp as they would have been.
Finally found a way to can apples and it was so easy! I was surprised by how much sugar is used. However the leftover syrup was not to sweet.
Thank you so much for sharing this!!
I’m glad you like this. The apples are so delicious and can be used for just about anything.
I just finished trying your method. Love it! I used Ambrosia apples and didn’t have any trouble with the apples browning. I had plenty of juice in fact I had a little leftover. I filled 13 quarts of processed apples. The biggest trouble was figuring out something to weight down the pie plate inside the 5 gallon bucket. I used the steel burrs from my wheat grinder. They made a perfect weight. I went the full 24 hours and oh my those apple slices are delicious! I think I’m going to process another batch tomorrow. Thanks for the great lesson.
I loved the idea but haven’t had much success with this method. I processed batches of Ida Crisps, 20 Ounce and Northern Spy. I modified the instructions by running the sliced apples through a bath of water and lemon juice. The jars were processed for 30 minutes based on several other recipes and the recommendation of the USDA Guide to Home Canning. The first batch was not packed firmly enough but appeared to preserve properly although the jars floated in the canner as the processing progressed. We used those almost immediately in crisps and galettes and the apples were not brown but were very flavorful and firm. The second batch were also run through the lemon water bath, I backed off to a half cup of sugar and they were packed more firmly in the jars. The quart jars floated in the canner, sucked air upon removal then sealed. Again the slices were firm and very white in color. A little reading on the internet suggested that the apple slices contained air which could not be expelled in this canning method and that is why the jars floated and the sealing was abnormal. The third batch was processed just like the second batch with the same results. I have refrigerated the jars and plan on reprocessing them after cooking the apples. I’ve never canned fruit other than jelly so this is probably my lack of experience but I will keep trying although apple season is over here. I will say I was very pleased with the taste, the bright color and the firmness of the slices I just don’t trust my results enough to put the jars on the shelf.
Trying this now! I’ve canned apples 3 times now using different methods and varieties of apples, but each time the pre-cooking plus the canning made apple slices that I deem too soft if not downright disintegrated. When I read this method I immediately recognized it from my jam and jelly making book by Christine Ferber. She almost always asks you to macerate the fruit overnight in sugar which draws moisture out of the fruit then you cook the resulting juice/syrup to 221º and then you add the uncooked fruit to cook for a short time to make the jam. This avoids overcooking the fruit and allowing the jam to taste very fresh and fruity instead of cooked down and caramelized (also a great taste but not fruity) I’m looking forward to trying the results of the method here for apples. I’d love to be able to dump a jar of apple slices into a crust add tapioca and bake. We’ll see:) Thanks for the tips.
Its almost time for apples here in Ontario, Canada. I will give you method a try, but please clarify if its 10min water bath or 20. Your written text says 20. Vid, 10
Thanks so much!
I used this recipe with great success last fall and they make the best apple pie filling. Thank you! It’s rhubarb season now and I’m wondering if this method might work for preserving a rhubarb pie filling. Have you tried this method with other fruits, particularly rhubarb? Any thoughts? Thanks!
I’ve not tried it, but I’d love to hear how it goes for you!
Canning rhubarb using this method worked great last year. Used them for pie filling throughout the year. Here I am at rhubarb season again, brushing up on your recipe. Thanks so much for sharing it!
did you use the whey that’s referenced in the video? or did you do them according to the written recipe? thank you!
Cindi…I did not use whey for the rhubarb (or apples). and loosely followed the written recipe. Main variant is using 1/2 cup sugar with no problem. Also, I freeze the extra rhubarb juice in an ice cube tray and add a cube or two to water when I want a refreshing drink.
Now I wished I had allowed my husband to make the larder/pantry larger, LOL. FYI – just moved my blog to a different domain hosting, and it’s just a place holder right now. Day job+farm+blog=NUTS
Do you have a preferred apple variety?
I’ve used both Ginger Gold and Gala and they turned out great. Haven’t tried other varieties yet simply cause those 2 are sold in bulk locally during the fall season.
How do you leave the apples for so long without them turning brown?
Not sure why they don’t brown up much. I bet some varieties will oxidize more than others, but I’ve only ever had slight browning.
You could always try putting them in a bowl of water while you finish cutting them if you’re concerned.
So, whey or no whey???
As I’m cutting & peeling I throw them in a bowl of water that I’ve added citric acid to bc I’m scared of it browning.
Also I do 1/2-1/3 cup bc 3/4 cup was too sweet for my husband to eat straight from the jar
Nope. They didn't really brown up too much at all, just a little. If I didn't have my team, I might have put them in water while I was cutting up the rest. But we knocked it out in a few hours 🙂
Nope. They didn't really brown up too much at all, just a little. If I didn't have my team, I might have put them in water while I was cutting up the rest. But we knocked it out in a few hours 🙂
These are pretty! Did you do anything to keep them from browning?
A product called Fruit Fresh works wonders for any fruit that tend to brown freezing or canning