Butchering Beef on the Homestead

We spent this weekend butchering beef on the homestead. We slaughtered, skinned, and eviscerated our Dexter steer.
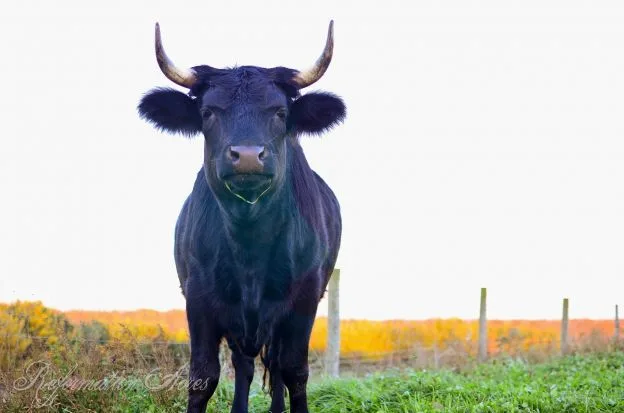
He was a 2 ½-year-old Irish Dexter and was born on our homestead to our first family milk cow, Maybelle. We chose Dexters because they are dual-purpose, hardy, thrifty, and supposedly make a nice grass-fed beef. We use the calves, who are born in the herd, for milk and meat depending on the gender. It just so happens that ‘Gus was born with the purpose of feeding our family in the form of meat rather than milk.
Livestock that has to deal with the stress of loading and transportation and being unloaded in an unfamiliar location with no feed or water available is generally recognized as producing an inferior quality product and we haven’t invested all of this time and energy and resources into raising our own beef to lose quality control now. It’s one of the 7 reasons we butcher our own meat. Saving $350 is another one. We wanted him to be happy and content up to the very last moment of his life and that he was. The cow dies and its last moments were munching the cow candy (grain).

What follows isn’t a tutorial on butchering beef on the homestead. (Some of our favorite resources will follow.) I feel we aren’t qualified enough for that. I am hoping that you just might be inspired enough to consider acquiring this lost skill for yourselves.
Killing and Butchering a Cow
Learn what to prepare and how you kill and butcher a cow.
Minimal Tools
I used and prepared these tools:
Slaughtering
- Gun: .410 shotgun
- Bullet(s): solid point
- A sharp knife for sticking
Skinning
- A sharp knife for skinning
- Sharpening Stone
- Gambrel
- Skid steer/hydraulic tractor with bucket
- 1 ½-2 ton chain hoist
- Hose for rinsing afterward
Evisceration
- Reciprocating Saw or Bone Saw (Don’t cheap out on a bone saw. You’ll regret it.
- Meat tote (for collecting offal)
- A place to dispose of guts/hide/head – Suggestions: A hole in the ground or a deep woods to dump it
Aging (If Desired)
- A cool, safe place to age meat (unless grinding it all)
- Block & tackle to hang halves or quarters (Or something secure to hang from hooks
Butchering
- Butchering Beef by Adam Danforth
- Meat totes
- Sharp Knives
- Bone Saw and/or Band Saw
- Bone Dust Scraper
- Buckets for Waste
- Meat Grinder for Butchering Beef on the Homestead
- Packaging Supplies
- Plastic Wrap
- Butcher Paper
- Freezer Tape & Dispenser (Get the dispenser. It’s the little things like this that will make the day go so much more smoothly.)
- Food Saver & Bags (We use this for ground meat only. I find they tend to lose their seal with irregularly shaped cuts especially and it takes so much longer to package meat this way. Wrapping in plastic wrap and then butcher paper is all the protection you’ll need.)
- Sharpie Marker to label
- Slow Cooker (to render tallow)
Evisceration and Skinning
We decided to corral the steer into an area with open access to the stock trailer where he would be fed and get comfortable overnight before butchering. You could do the same thing with a pen. Because we have the trailer and no pen, that is what we used. It’s a good idea to have them contained so you can get as close as possible, and minimize their flight zone in the event things don’t go as planned. We don’t move it to a far area where you will skin and eviscerate it.
Thankfully, one shot was all that was necessary. Although for a moment that was questionable as he didn’t go straight down, but lunged forward out of the trailer before falling.
As with hogs, we make a sticking cut to bleed him out as quickly as possible. We prefer to make the sticking cut off-center, next to the esophagus. With the blade towards the spinal cord, rocking the knife back and forth, severing the carotid artery. (As opposed to cutting across the next, severing the esophagus, and contaminating the meat in the neck.)

We removed the head. Then we found the back tendons and he was hung from a gambrel using a skid steer that we happened to have for another purpose. Last time, we borrowed a tractor with a bucket. Next time we will probably use a chain hoist.

The Skinning Process
Without going into detail, it seemed to me that the skinning process is basically the same as for deer or even hogs. (See our hog butchering videos here.) You make the circle cuts above the hooves, up the inside of the leg towards the midline. Down the belly and around to and down the back.
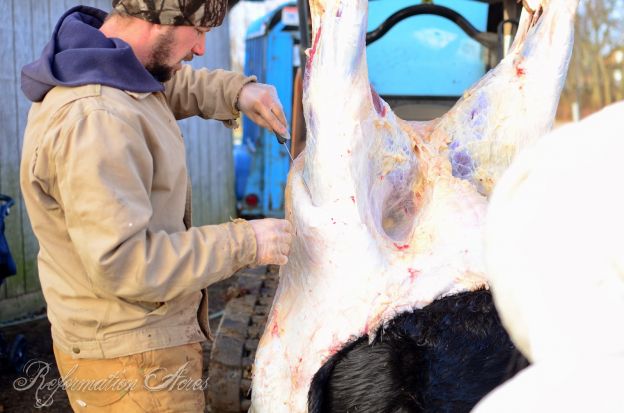

The Evisceration Process
We used a reciprocating saw to remove the head and feet and to split the breast bone.

Then he worked on removing the man parts that were not taken care of two years ago…

The cow was lowered down onto a piece of plastic because the gravity was causing the swelling internal organs to fall down into the area where he needed to cut through the breastbone so .

A reader shared this link to another homesteader butchering their own meat. Sadly it was too late for us to do it, but one idea I loved was to cut open the stomach and add the partially digested contents to the compost pile!

Gravity helped them pretty much fall out at this point. Where they were still stuck he loosened them up and they fell to the ground with only a minimal, yet still visible splash.
And with that went most of the animal’s weight.


The Harvesting Process
We harvested the offal. Like the steaming liver, sweetbreads, loads of fat, kidney, and heart.
Jared tried the sweetbreads for lunch on Sunday and Bill made some of the liver. However, both found the proximity of time to be too close to the evisceration for the disconnect to be made and they associated the flavor with the odor. In the meanwhile, the rest was frozen for now and we’ll decide what to do with it later. I’m wondering if grinding it and mixing it in throughout the ground meat might be an option.
The oxtail is brought in as early as possible, along with the fore shanks and I make Oxtail Soup with Parmesan Herbed Dumplings to warm the cold bodies later when they’re done.

After the carcass was halved, it was also quartered between the 5th & 6th ribs (counting from the head towards the rump) so as to make it more manageable and hang it higher to keep it out of reach of the dogs in case someone accidentally left the shop doors open during aging.
Aging
Weather will determine how long the meat will hang for aging. A forecast of around 40 degrees during the day for about a week is nearly perfect.
If it gets too warm the meat will spoil. Too cold and the enzymes that work during the aging process won’t be able to do their job. This is not good for butchering beef on the homestead.
Through the aging process, the meat will become more tender as the enzymes break down the muscle and more flavorful as water is lost from the meat thereby concentrating the flavor and increasing its intensity. This is particularly important with grass-fed beef since it would be leaner than commercial beef. That is why some choose to grain-finish their beef. In addition to flavor, beef needs the fat layer to prevent spoilage during the traditional dry aging process. Thankfully, our bull had generous layers of fat.
There are two types of aging – dry and wet.
What is Aging?
Dry aging is how aging has traditionally been done by hanging the meat in an area with airflow where the temperature and humidity are controlled for 1-3 weeks. Meat is butchered in the cooler season to accommodate this process without the need for expensive systems. We actually waited too long and are heating the area where our beef is hanging since the daytime temperatures are in the mid-twenties and are dropping down into the teens at night. Forties are ideal.
Wet aging is done in a vacuum-sealed bag at temperatures in the mid-thirties for 1-4 weeks, increasing tenderness, but not improving the flavor. This is how most commercial beef is aged – beef as we know it. It is obviously the preferable method for commercial producers because it retains the water that is lost during the dry aging process.
Dry aging will also produce a layer of jerky-like beef on the outside. It reminds me how cheese has a rind that needs to be removed making for even more loss. Both methods will tenderize the meat, but each flavor the meat in a different way. Dry-aged beef is described as gamier, while wet aged as bloodier.
We dry age the beef on our farm for about 14 days. Then, found out that it makes the meat flavorful without too much weight loss. We tested meat at 14 days, compared it to 21 days, and found no appreciable difference in flavor, but there was a lot more shrinkage.

Butchering
I believe that the actual butchering is the most difficult part of making beef on the homestead. Most folks who are going to tackle a project like this have experience with deer or pork and up to this point, it’s about logistics. The basics are fairly similar.
It has been extremely challenging finding resources that will get you cuts that you are familiar with using in the kitchen and we spent the first several times with our method having a general knowledge of where certain cuts come from. After breaking down the primal, we go in first for steaks, followed by anything that came off in a chunk for roasts, and then anything too small for a roast was cubed and ground.

By far the best and most helpful resource to date has been Butchering Beef by Adam Danforth. I’ve been disappointed with a lot of butchering books, but not this one. You will bloody these pages up, but in the end, you’ll have meat that you can label as the actual cuts and not just “Beef Roast.” Knowing what to do cuts down considerably on waste. I’m not even going to give you an overview of how to butcher because I simply won’t be able to equip you the way that book can. It is going to be just as valuable a tool to your success as your sharp knives and packing paper.
In the past, we have also used this playlist of videos we used HERE as well as the resources HERE. You might be interested in checking them out to supplement your butchering education.

Suggested Read: Our Plan to Raise a Year’s Supply of Meat on the Homestead
Cost Analysis for Butchering Beef on the Homestead
The current yield from a 2 ½-year-old Dexter steers 353 lbs. 2 oz.
(We are not equipped to do a hanging weight so this is packaged meat in the freezer.)
Cost to raise a steer
2011 expenses- $85.84
2012 expenses- $848.00
2013 expenses- $377.68
Total: $1311.52
Our Price per pound: $3.71
Apples to Apples
Price for local grass-fed beef (whole): $3.05/lb. ($1077.09)
Processing costs for whole beef at our estimated hanging weight: $321.89
Total: $1398.98
Savings: +$87.46
In the Freezer
85 lbs. ground meat
53 lbs. 15 oz. roasts
54 lbs. 3 oz. steak
2 lbs. stew
17 lbs. fat
18 lbs. 4 oz. bones
4 lbs. kidney
7 lbs. liver
12 lbs. scraps (chicken feed)
100 lbs. cut off/trimmings – things that are typically included in a hanging weight
Previous Yields
4-year-old Dexter bull: 270 lbs. (Freezer weight)
2-year-old Jersey steer: 415 pounds (Hanging weight)
2-year-old Shorthorn heifer: 526 lbs. (Hanging weight); 325 pounds (Freezer weight)


Thank you so much for this helpful information on butchering! I definitely love learning the art of butchering and homesteading to make sure I am getting everything out of the animal. Thank you!
Awesome Awesome Awesome!!!!!!!! Thanks for posting!!!!!